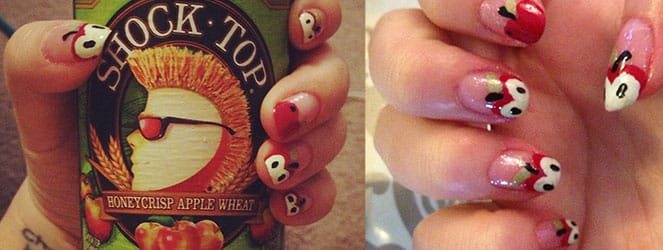
Apples Nail Art Design
This is a throwback design that I made last year! I just found the photos of it again and can’t wait to do this design again soon- it’s pretty perfect for back to school, don’t you think? I even happened to be drinking a Shock Top Honeycrisp Apple Wheat beer the day I painted them- which was a total coincidence but awesome for a photo! This nail art design was SUPER easy, so you can rock it too! Just follow the steps below!
Materials:
- Sparkly “clear” (or similar transparent but glitter filled) polish
- Red nail polish (I used my fave red: Sally Hansen Insta-Dri in Rapid Red)
- Black nail polish
- Green nail polish
- White or cream colored nail polish
- Toothpick or dotting tool
- Clear top coat
Instructions:
- Do one coat of the clear glitter-filled polish on clean dry nails. Let dry.
- Do a second coat for extra sparkliness! Let dry.
- With red polish, paint the bottom right side of your fingernail, then paint the bottom left side. This will create an apple shape! Repeat for all fingers. Let dry completely.
- With green polish, paint a little leaf on the top of each apple towards the middle/top. Let dry.
- Pick which nails you want to have as “sliced open” apples and which you want “whole.” I picked to “cut open” all apples but one on each hand, because they are so cute when halved! Whichever apples you are halving, use your white or cream nail polish to paint the bottom right side of your fingernail, then paint the bottom left side just like you did before with the red! It should resemble the photos! Let dry.
- Use a toothpick and the black nail polish to make little stems by the leaves, little seeds in the apples and little details wherever you like! Let dry.
- When everything is totally dry, seal in the look with your clear top coat. Done!
I hope you liked my apple nail art design! If you try it out, share a photo in the comments! I’ll try another fruity design soon!

Adorable! You just reminded me to put my watermelon wraps on next week before summer ends.
Very fun! Love it! 🙂