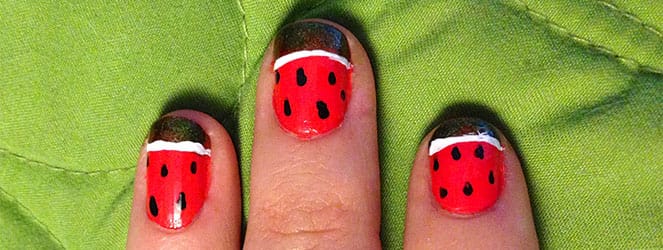
Watermelon Nail Art Design
Inspired yesterday by Aquariann‘s watermelon nail wrap post, I decided to try my hand at making my own watermelon nail art design! My apple design is still my fave fruit so far, but these are a pretty cute way to end the summer. BONUS: If you skip one step, you end up with strawberry nails! Which do you like better?
Materials:
- Pink or red nail polish
- Green nail polish
- Black nail polish
- White striper or white nail polish + nail art brush
- Dotting tool or toothpick
- Clear top coat
Instructions:
- With clean dry nails, do one coat of your pink or red nail polish and let dry. I used my favorite coral shade (Essie’s “Come Here”) since soon I will have to retire it for the season! You don’t have to use coral, if you don’t want to, though! You can use red if you are going for a strawberry look, or hot pink for a great watermelon design!
- See those streak marks from one coat? Do a second coat and let dry completely.

- With your green polish (I used Confetti’s “My Favorite Martian”), do a somewhat thick french tip on the top quarter to third of your nail. This is the top of your watermelon slice! Let dry.

- If the polish you choose is streaky here too, do a second green tip coat and let dry.

- Use your dotting tool or toothpick and some black nail polish, and make little seeds throughout the pink/red. Let dry.

- Right now, you can call it a day, do a quick coat of clear polish, and end the design with some strawberry nails if you want!

- If you want to continue to have watermelon nails, use your white striper or white nail polish and a nail art brush to make a thin line between where the pink and green meet.

- Finish with clear top coat. Done!


So which do you like better: straawwwwberries or watermelons?
Lovely idea! I love everything watermelon 🙂
Wow, that was fast! Thanks for the shout out, how fun to be an inspiration for such cute nails. ^.^
These nails came out great! Love that you happened to have some of those yummy candies to take pics with too. =0)